
How to Use Help4 Builder Starter Templates Without Replacing a Live WordPress Page
August 10, 2026
Starter templates save time because they give a new WordPress page a useful structure before you begin writing. They become risky only when a quick import is treated like a harmless edit to an important live page. Help4 Builder Suite has distinct insertion and page-replacement choices, responsive previews, and History-based recovery, so the right workflow is simple: start in a draft, choose the mode deliberately, review the result at every screen size, and publish only after the page is behaving as intended.
Start With the Page Goal, Not a Thumbnail
Choose a starter by the job it needs to do. A service page, product collection, support article, documentation index, release note, and checkout-support page need different content order and calls to action. A template that looks polished in its thumbnail can still be the wrong foundation for the page a visitor needs.
Write down the page’s first job before you open Builder Studio. For example, a service page may need a short explanation, proof, frequently asked questions, and a contact path. A support page may need a clear problem statement, steps, related guides, and an escalation path. That short plan makes it easier to recognize whether a starter helps or merely gives you more sections to remove.
Use a Draft for the First Import
Open the intended page by title and confirm whether it is a draft, staging page, or public customer page. When you are learning a starter or making a major structural change, work in a low-risk draft or an approved staging environment. Do not make a homepage, revenue page, booking page, checkout page, or active campaign page the first experiment.
A draft gives you room to remove sections, rewrite placeholder copy, and test media without visitors seeing an unfinished page. It also creates a clearer review conversation: the page owner can approve the intended structure before you touch the live route. The WordPress staging-site guide explains how to choose a host-supported test path when the change needs broader validation.
Know the Difference Between Insert and Replace
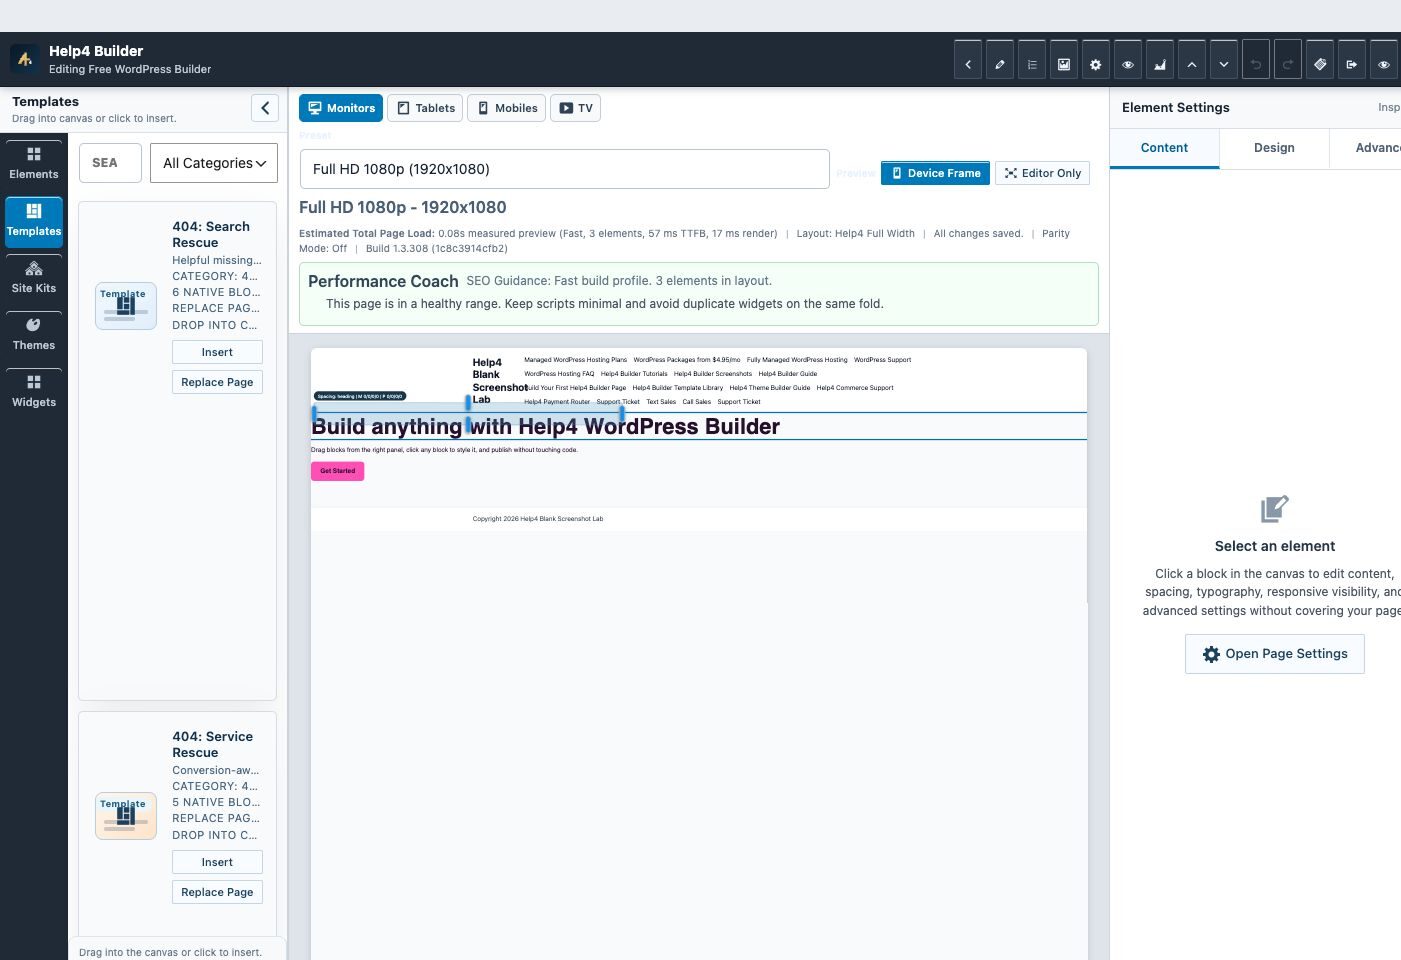
Help4 Builder’s template library can add a reusable structure to the current page or replace the current page structure. Those are different actions with different risks.
- Insert: add a reusable section or starter structure to the current draft when you want to preserve the page’s existing content and layout.
- Replace page: use only when you intentionally want the starter to become the page’s new structure. Confirm the page title, current location, and the target page state first.
- Style-focused application: use the design path when existing content and structure must remain while shared styles need to change.
If you are unsure which mode is appropriate, stop at the preview. It is much faster to select a different starter than to repair a replacement that changed more of the page than expected.
Preview the Starter Before You Apply It
In the template library, search by the outcome you are building: service, product, support, local, recent work, launch, documentation, or checkout. Open the starter, then compare its sections with the page plan. Look for the heading hierarchy, the place where proof or instructions will go, the primary action, and any decorative blocks that do not help the reader.
Confirm the selected page, the selected template, the current Builder Suite version, and the intended responsive view before applying a change. This small pause catches a common support problem: changing a similarly named page, reusable template, or draft instead of the page that was actually approved.
Clean the Draft Before You Think About Publishing
- Replace placeholder headings and body copy with the page’s real purpose and next step.
- Remove sections that do not support that purpose instead of leaving generic promises or empty cards.
- Use images you are allowed to publish, then add useful alt text that describes the image’s purpose.
- Check buttons, menus, forms, and internal links so they lead to the correct place.
- Keep shared headers, footers, and global templates separate from a page-specific experiment unless the project owner approved a broader change.
Start with one page and one confirmed result. A repeatable page pattern is more valuable than importing several templates and trying to reconcile them later.
Check Desktop, Tablet, and Mobile Early
A template can look correct in a wide editor frame while a long heading, button label, image crop, or card row breaks on a smaller screen. Review the page in the Builder’s desktop, tablet, and mobile views before publishing. In particular, check headings, buttons, forms, navigation, image crops, spacing, and sections with multiple columns.
Then use the clean public page after publishing to confirm that the saved result matches the editor preview. A builder preview proves that you are editing the right design state; it does not replace a visitor-facing check. When cache or delivery is part of the site, use the WordPress cache and CDN testing guide to confirm the current public page rather than repeatedly refreshing the editor.
Recover From a Bad Result Without Piling on More Edits
If the wrong structure lands in the draft or the saved page no longer behaves predictably, stop adding fixes. Help4 Builder documentation directs editors to use History or a known-good revision instead of rebuilding the page from memory. Review the candidate recovery point, load it as a draft where available, inspect it carefully, and publish only after the page owner agrees it is the correct version.
Do not use recovery as a reason to skip review. History is most useful when you know the last page state that was correct. Record the target page, the starter you tried, the chosen mode, and the verification result. That short note makes the next recovery step much clearer, especially when more than one editor is involved.
Keep Commerce and Payment Changes Separate
Templates are useful for public product collections, help pages, or campaigns, but cart, checkout, account, and payment-routing changes deserve their own testing window. Confirm the normal product-to-cart-to-checkout path after an approved store design change, and keep payment-router decisions independent from template work. The Stripe Router checkout-testing guide covers the separate payment-flow checks that belong with an authorized routing change.
Use Help4 Builder Suite as a System
Help4 Builder Suite pairs visual page building with starter templates, reusable structures, global layout controls, responsive views, and practical recovery guidance. Install the builder and the Help4 Blank companion theme through the approved workflow first; the Help4 Builder Suite and Help4 Blank installation guide covers that foundation.
For the current template screens and narrated walkthrough, use the official Help4 Builder Template Library guide. The official Builder Suite product page also documents the current starter-template and Builder Studio capabilities.
Safe Starter Template Checklist
- Confirm the intended page and its current public or draft state.
- Choose a starter by the page’s job, not only its visual style.
- Preview it before making a change.
- Use a draft or approved staging path for a structural replacement.
- Choose insert, replace, or style-focused application deliberately.
- Remove placeholder content and test every button, form, link, and image.
- Review desktop, tablet, and mobile before the publish decision.
- Verify the clean public route after publishing.
- Use History or a known-good revision if the selected mode changed more than intended.
For more troubleshooting, staging, cache, and maintenance help, start from the FixItPhill WordPress support hub. The steady approach wins here: one page, one intended change, one public verification.
